Seeing red.

The Traffic Light Special by Jon Tremlett for Soulcraftcandy 2013

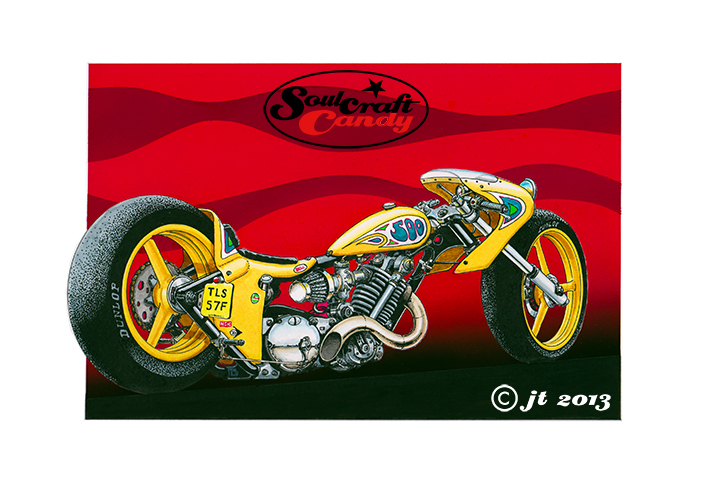
Applying the thousands of ink dots that make up the shadow areas in the “Slugger” picture featured in the previous post, got me thinking about what the image would look like if it was in colour. This short period of playful thought led to the creation of this second image based on the same drawing. It seemed like a fun idea to start by turning the bike into a street machine, but something built for short sprints like dashing between sets of traffic lights. So it needed lights, some different handlebars and a license plate, all fairly easy to include. It also felt right that it should be brightly coloured, a reflection of the exuberance of the activity it was created for.


So the main body of the picture employs the watercolour and pen technique used a good deal lately. I love the way it gives the pictures such a punchy look, almost jumping off the page and into your eyeballs. I so liked the dotted tyre shading from the last version I kept it in, contrasts nicely with the grey.


The bit I’m most pleased with though is the background, the bike really needed something big and bold behind it. I had a good fiddle in Photoshop before doing it, playing around with some ideas based around red, amber and green, the traffic light palette, but these merely made the whole thing look like some odd homage to Rastafarian culture. Needless to say they got dumped, too weird, too complicated, but the red element remained as it worked really well with the bright orange of the bike. This final version is simply primary red overlaid by a darker tint made by adding black. The background is air brushed using gouache paint. I covered the whole picture area with lo-tac film and cut around the bike very carefully with a craft knife, it always surprises me how little pressure is needed to cut the film so it pays to exercise the upmost patience. A solid red was then sprayed on and left to dry before removing the film. Another piece of film was then laid over and the lines for the wave forms were put on in very soft pencil. These were then cut out, again with a fresh bladed craft knife, and sprayed with tint made from the same red with some black added. Even though the picture already had a black ground line, the above process was repeated once more so that pure black could be sprayed on to give the gradient shading of the black area dissolving into the red. Challenging, messy and rather time consuming but the outcome is everything I wanted.


It’s called “The Traffic Light Special”.


Advertisement

Keep it simple, stupid.

Cafe Racer cartoon from soulcraftcandy ©Jon Tremlett 2013

Ok, so I air-brushed it. Some may construe this as giving up, caving in and taking the easy way out, but I don’t see it that way. The concentric rings of colour idea was something I wanted to try, but knowing that it might not go according to plan, it was only common sense to have a solution tucked in the back pocket. Try as I might, I could not get it to work manually. The twin evils of watery paint and a shaky hand conspired to create a cringe making collection of patchy coverage and hopelessly imprecise curving lines. If it was a report card it would have had “Messy, must try harder” written large over it in red ink. I thanked myself for at least taking the trouble to try it out on a separate sheet of paper. 


I’m sure it might have been less traumatic if I’d tried it in acrylic paint, or mixed up house paints, as a good friend has since suggested. But I really didn’t want to make another trip to the art store to purchase even more stuff that I would have to find a home for in the now bulging shelves of the studio. 


The air brushing was not without its moments either. Purchased many years ago to apply even coats to a rather expensive model I was making, the airbrush has spent most of its life in its box, venturing out occasionally to be fiddled with but never wealded as a precision instrument. As far as using it to create a picture, the last time I tried that was at art school thirty years ago, and the results were pretty poor even viewed through rose tinted specs. I’ve never bought a compressor, resorting to cans of air such is the infrequency of its use. Anyway, armed with some low tac Frisk film I set about carving the concentric lines with a scalpel to create pieces of removable mask. I had completely forgotten how difficult it is to replace a curving piece of film accurately onto the page and that any overspray on the surrounding mask adheres immediately to your finger tips and goes everywhere you don’t want it. Result: another shocking mess. Finally, realising that the KISS principal (Keep It Simple Stupid) was my only option I recovered the piece in another piece of film, cut around the drawing to reveal the background space, and sprayed the whole thing in one go with blue emanating from one corner and the yellow from another. All the film was then lifted off when it was all totally dry. Et voila, finished, and despite being the result of expediency as much as desire it looks pretty good considering. The compromise may not be ideal but it saves me from looking at a finished piece with the perpetual frustration of knowing that a simpler solution would have yielded a better result.


Cafe Racer No.4.

So here we are, presented for your delectation today is the fourth finished drawing in the Cafe Racer series. Like the previous drawing it treads the line between caricature and reality, leaning in one direction or the other depending on which bit you’re looking at. I’m not one to shout loudly about my work but I have to admit here that I’m very happy with it, all things considered. What was mentioned in Post No. 63, “Cafe Racer 3, finally” about how ‘static’ and ‘moving images dictate the background in very different ways rings true here. The original idea of a stylised chevron barrier, you know, the big black and white things that alert you to a bend in the road, just didn’t work, so a far simpler approach was taken.


The perennial problem that faces you when you’ve got parallel or converging lines to cross-hatch between is staying inside the lines. If you have an occasionally wobbly hand as I do, then it can be a real ordeal. Each stroke of the pen is a potential mess maker waiting to happen. My solution, and it’s obvious when you think about it, is to mask off the area. Normal masking tape’s no good though, particularly if you want to preserve the surface of your paper. Every roll tried just seems too sticky. Back in my designer days, some guys I was working with at Philips’ studio used a lovely low-tac masking tape when making their marker renderings. It was brilliant stuff but I’ve no idea what it was called or where I could get any. If you know, please let me know. My solution currently is Scotch Removable clear tape which is similarly low-tac. It doesn’t bend as much as masking tape does, so it has its limitations but for these purposes it’s fine, and not so thick that it makes the pen jump on the edge. Pretty good and a neat way to get those edges really crisp.


The next two drawings are already laid out in pencil so I’ll be posting updates on their progress when there’s something to show.