Scribbles.

Despite much evidence to the contrary it is still a feature of the drawing activity (for me anyway) that one finds oneself staring blankly at a clean piece of paper without the slightest notion of what to put on it. You find yourself a bit stuck. Somewhere back in the annals of the blog this subject has probably already been mentioned, but the other day it happened again and a long forgotten way to get round it emerged from the deepest recesses of the ol’ grey matter.

As a child, art class at junior school was always something to look forward to with relish. as a consequence we needed absolutely no encouragement to throw ourselves head long into cramming the available paper sheet with images. It was as if our naivety gave us a courage to overcome any fears we may have harboured about subject matter, scale, detail and colour in our image making. The sheer joy of being creative for an hour or two gave us the energy to be unconstrained by any and all compositional constraints. What a lot of fun it was but, sadly it wasn’t the same for everyone and things don’t stay this way for ever. In fact I remember certain kids who suffered being utterly intimidated by a blank sheet of paper or a full palette of paints. Gregory King wasn’t one of them though, oh no, he knew exactly what he was going to paint or draw every time, a big red racing car. The bigger and redder the better. These remained a bedrock of Greg’s creative output for as long as I knew him. When charged with the task of rendering a nativity scene he would find a way to squeeze a big red racing car in there somewhere. We could analyse Greg’s fascination but I digress. The essence of this is that he had found a way to never be short of an idea.

As we learned more and knew more, our creativity changed too. The free flowing rampage across the paper of pencil, charcoal and paint fell victim to learned concerns about proportion, composition and fidelity of colour. It was as if a pendulum was swinging towards its other extreme and would culminate in either total mastery of ones medium or the frozen wastes of the blank sheet of paper. For any of us who’ve accessed our artistic creativity for most of our lives, learning to steer the pendulum towards the former outcome rather than the latter is a lifelong challenge which we confront relatively frequently. Moments of absolute flow are matched by others of a kind of creative block. Only we ourselves can solve the problem and navigate these moments. These strategies are not hard to learn, the challenge lies in finding those which work for you and remembering them when needed.

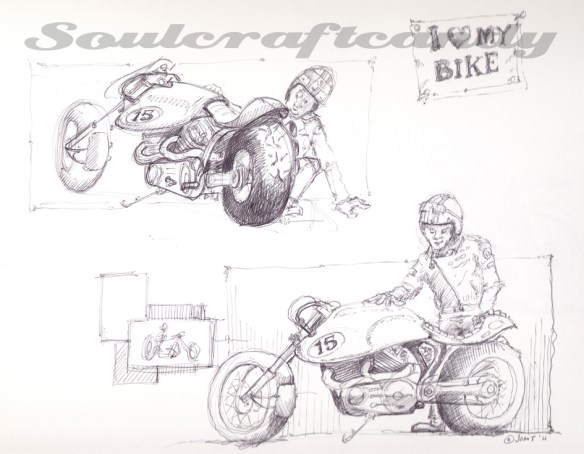
For some all it takes is simply making a mark on the paper, drawing a random line to get you going. For others it starts with an inky fingerprint or a splash of paint. Some people choose to merely copy something to get the process started. The sketch at the top of this post began with a personal favourite, hovering over the paper with a pen and gently touching the surface as the hand engages in a random series of movements. In a way it’s just like starting with a random line but feels very different and prescriptive. Anyway sooner or later something begins to appear. It doesn’t take much and off the imagination goes down some path. As the sketch emerges I maintain this hovering approach with the pen and move around the drawing adding bits here and there, slowly building elements and detail. Using a pen means not being able to erase anything, which has interesting side effects and introduces a gentle kind of discipline to the process. Though having said that, the slightly non-comital nature of line creation helps to keep the whole thing a bit more fluid. This more scribbly way of making an image is quite liberating and definitely helps to loosen up the mind as well as the hand.

In a way the drawings created are never really finished, you can stop whenever you choose to, and this lends them a liveliness often lacking from more formal sketches and drawings. Their quality might only be appreciated through the eyes of the beholder, but if they’ve unlocked the block then their purpose is complete. Here’s the next sketch that popped out straight after the one above.

Painting the bodywork.


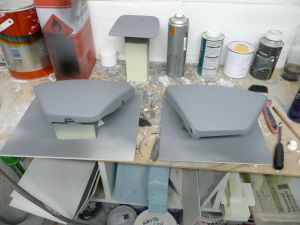
The full list of parts that were to be painted consisted of the fuel tank, two side panels, front mud guard, rear mudguard and the small fly screen. Six parts in all. Before preparing their surfaces for painting it was important to make sure that all trimming had been done and that all edges were smooth and free from any swarf.


Although it would have been ideal to hang the pieces whilst painting them there wasn’t enough room so some stands were made out of scrap wood and card, and the parts could then sit comfortably on the spraying turntable during application.


Preparation for priming: Firstly everything was thoroughly cleaned and degreased. The tank badges were removed, mountings ground down and body filler applied to fill any recesses. For the plastic side panels a small piece of ABS plastic was glued behind the now empty badge holes to provide a backing for the filler. This was all then sanded flat and all old paint removed using fine grade wet and dry paper. Once dry everything metal was treated to some etch primer. After another rub down with fine paper (wet and dry, 800-1000 grit) it was all then coated in grey primer and left to dry overnight. No plastic primer was used as the straight cellulose primer adheres well to plastics like ABS without the need as long as the surface has a good key.

Application of base black coat. Another rub down to sort out any tiny surface imperfections and a final degrease to remove any finger prints it was time for the black. For cost and convenience reasons I’d chosen to use standard cellulose paints for the job, a litre each of black and white. These would be mixed with clean thinners to make the right consistency for applying with a small gravity fed spray gun. In effect the paint ends up being of a consistency somewhere between milk and single cream. Too thick and you need too much pressure running through the gun and risk creating an “orange peel” finish. Too thin and you risk the paint going on too wet and creating runs or “curtains”. In essence it is purely experience that guides you in balancing paint thickness, air pressure through the gun and controlling paint flow. Having said that it is invariably the case that building up the paint in a number of thin coats will give you the best and most consistent results. Runs and other imperfections can be rubbed out later but if you can avoid them all the better. Once sprayed all parts were then left to dry for a couple of days. It’s worth remembering that when paint feels dry it may be so on the surface but, often it remains quite soft underneath for some time and can easily be damaged by a finger nail or small knock.


Application of white stripes. With the black fully dry everything was rubbed down again with extra fine paper and water to provide a good “key” for the stripes. The stripe edges were masked off with professional quality 3M Fine Line masking tape. This is a plastic based tape so has a very crisp edge, unlike readily available paper based tapes which don’t, and as a result never give you a crisp line on your finished part. It was really worth finding this stuff and paying the extra for it. It comes in a variety of widths and is relatively flexible too, so you can create smooth curves as well. Lovely stuff. This was used on the edges and the remaining area covered in conventional tape and paper. Some white primer went on first and then the final white was built up slowly in light coats. The masking was removed after a couple of hours. Long enough to let the paint dry a bit but not so long for it to harden up and risk tearing. Again everything was left to dry for a couple of days.

Final lacquer coats: Although standard paints come as gloss finish straight out of the tin, they have a percentage lacquer content already, they invariably need a good polish to bring out the full glossiness once fully hardened. As a protective measure as much as for aesthetic requirements a separate clear lacquer is often applied to give the surface some extra depth to the shine. For all parts except the fuel tank, the plan was to give them all a good coating of cellulose lacquer to finish off. The tank itself was going to get some petrol proof lacquer I’d spotted in the auto shop. Unleaded fuel just eats normal finishes for breakfast unless you’re lucky enough to be using 2-pack systems. Not unusually the black and white had dried to a kind of sheen. This is not a problem as both would be rubbed down again using 1200 grit paper and water. This creates a very matt surface but provides enough of a key for the lacquer and the full colour returns upon application. The last thing to do was apply the small vinyl cut graphics that had been made for the side panels and the screen. These decals are cut from single colour vinyl sheet, so the red parts are separate from the white and were supplied by a friendly repro shop who have done stuff for past projects. Supplying your own artwork as a vector art file keeps the cost down and the lines crisp, and there are a huge range and variety of vinyls available if you ask.

Making sure everything is smooth, dry, clean and free of any dust is crucial before putting on any lacquer. Many pro paint shops use Tack cloths at this stage. Essentially these are a cloth made from a very loose weave cotton impregnated with a slightly sticky waxy compound. Passing one of these gently over your paintwork picks up and removes all tiny little bits of dust and grit from the surface. They are designed not to leave any residue on the paint either. So a quick once over with one of those and it’s lacquer time. Like the paint this is built up through many light coats carefully following the instructions on the tin. Go too heavy with this stuff and it runs very badly.

Lacquer, if it’s not 2-pack, needs to be left for a good week to properly harden up before polishing. A long time and it’s a real challenge to resist, but then again it’s a good time to take care of all those outstanding little jobs like tidying up the wiring, setting up the drive chain and adjusting the brakes. The next big job was going to be the final assembly so my fingers were crossed the seat would return in time.


Getting ready to paint.

All the prep was worth it.

Before getting stuck in to the painting of the bike parts I thought it might be useful to share some of the things I’ve learned about spray painting. This is not a definitive list of top tips merely some things I’ve picked up over the years through being taught basic technique and learning from some ugly mistakes.

My memory is full of useful tips passed on to me and hard learned lessons about putting paint onto objects. The first is that paint and its application is nothing to be scared of and secondly, that the process rewards the patient. All manner of practical skill areas are full of old maxims and adages that seasoned practitioners swear by, and for good reason. One that applies to painting anything is the six P’s, and it goes like this: “preparation and patience prevent piss poor performance”. The first two P’s are the critical ones I think. Over the years, working in modelmaking, prototyping and design it has been an often painful experience to witness hours of painstaking work be reduced to scrap because of a lack of patience and prep in the paint phase. For some unknown reason people often behave as if paint were some magical substance that has the ability to apply itself and achieve the most perfect of finishes by its own volition. This is not so of course. Paint needs a lot of help to do what it’s meant to do properly and, give you a finish that is both beautiful and durable. Paint needs time so the more you can allocate to it the better. Planning out all of the various steps that you will need to go through is a good habit as it allows you to tackle things in batches rather than individually, piece by piece.

It’s also worth taking time to prepare the area you’ll be working in with as much attention to detail as the part you’re going to spray. Dust and other airborne particles are your enemy so minimising their presence is worth it too. Sprayguns, mixing pots, stirring sticks and turntables all have the capacity to ruin your finish so making sure they are clean and dust free helps too. Similarly, cover up surrounding areas with dust sheets as any overspray will cover everything in the vicinity with a fine layer of dust which you will only have to clean off later. Obviously if you have a dedicated spray booth this helps but giving it a good clean is never a bad thing. In fact if you can hang some dust sheets around your work area forming a kind of cubicle to spray in it’s worth doing, but make sure you’ve got a bit of air flow in there.

There are many different paint systems out there so it’s valuable to know your paints. Ask your local supplier, research on the internet or talk to an experienced hand but, always make sure that your primers, top coats and lacquers are compatible with each other and with the material your object is made of. Nothing disappoints more than a top coat that crazes over a different formulation primer or decals that gently dissolve as the first coat of lacquer goes on. If you’re in any doubt, ask. Finding and getting to know your local paint specialist is well worth the cost of any time invested. Experts love giving advice if you ask for it nicely anyway.

Whether you’re using rattle cans or a spray gun apparatus, the technique is essentially the same. Any differences are really in how much control you can excerpt over each method. A can comprises paint, gun and air supply, or propellant, in one convenient vessel. Using a gun requires a compressor and all manner of sundry bits and bobs to effect the same result. But the can doesn’t allow you to control air pressure or flow, paint flow or paint consistency. Often the final result is reliant on knowing the limitations of each method and working within those parameters. It’s amazing what you can do with a spray can if you follow basic rules, and it’s staggering what messes I’ve witnessed people create with a spray gun set up.

Spraying to a high level requires a good deal of rubbing down between coats to key surfaces and to gently eliminate surface irregularities. Sadly there is no quick way to do this. But it helps to use warm water with your wet and dry paper whenever you can. It not only helps keep the grit on the paper from clogging, obviously, but also stops your hands from getting freezing cold in the process. Despite it being very tempting to rip into old paint with coarse grit paper to speed removal, it only ends up putting deep scratches into the base material which you only have to remove as well. It’s surprising how much paint you will need to eliminate all the scratches.

Spraying to a high level requires a good deal of rubbing down between coats to key surfaces and to gently eliminate surface irregularities. Sadly there is no quick way to do this. But it helps to use warm water with your wet and dry paper whenever you can. It not only helps keep the grit on the paper from clogging, obviously, but also stops your hands from getting freezing cold in the process. Despite it being very tempting to rip into old paint with coarse grit paper to speed removal, it only ends up putting deep scratches into the base material which you only have to remove as well. It’s surprising how much paint you will need to eliminate all the scratches.

If you can, and have the room, create separate areas for paint mixing and storage, spraying and drying. Helping to minimise contamination from one part of the process to another can save a job from ruin. Small splashes from mixing and cleaning can travel a lot further than you think. It also enables you to store your paint and work piece at the same temperature. Cold paint on a warm object and vice versa can often be a sure fire way to achieve a dodgy finish.

As a final cautionary note, always wear an appropriate mask or respirator. Those flimsy paper things may protect you from some dust but not some of the rather nasty solvents that paints often contain. And get some protective gloves too, vinyl or latex. Personally I use vinyl as latex can irritate my skin, and ones without talcum powder keep your hands free of white dust that only ends up on the work piece if you’re not careful.

So there’s a bit of background to set the stage for spraying up the bodywork parts.