All drawn out? Grab the bull by the horns.

The Bull, a sketch by jon tremlett for soulcraftcandy 2013

There is a phrase we hear often when faced with tackling a thorny problem and one that seemed very apposite for inclusion in this post.


“You just have to grab the bull by the horns”.


It’s not often I’m reluctant to pick up a pen or pencil and start scribbling but, this has very much been the case over the last few days. Returning home last week after a frantic three day stint of freelancing work, I can only describe my state as being “all drawn out”, bereft of any inclination to put pencil to paper. Why? Well, this particular bit of work involved creating about fifty separate drawings as part of a mammoth communication exercise at the early stage of a very large and complicated project. By the end of it I was done, the tanks would need refilling before another image left the end of my pen.

The Bull, original sketch by Jon Tremlett ©2012

The creative energy required for idea generation at times like this seems huge, but that doesn’t mean that there’s none there, just that less is available for a while. So this is a great time to reach for one of a number of pieces which are sitting comfortably in the “on-going” pile. Moving something along a bit, rather than needing to start afresh is, for me at least, a cunning way to grab the bull by the horns without expending too much effort, and get back into the swing of image creation after a bit of a lull. Making small adjustments and working up the level of detail are both important to the final outcome and are both things that one doesn’t need to rush, one can take ones time to think carefully about each change and work in a slower, more deliberate way. It is very satisfying.

The Bull t-shirt by Jon Tremlett ©2013

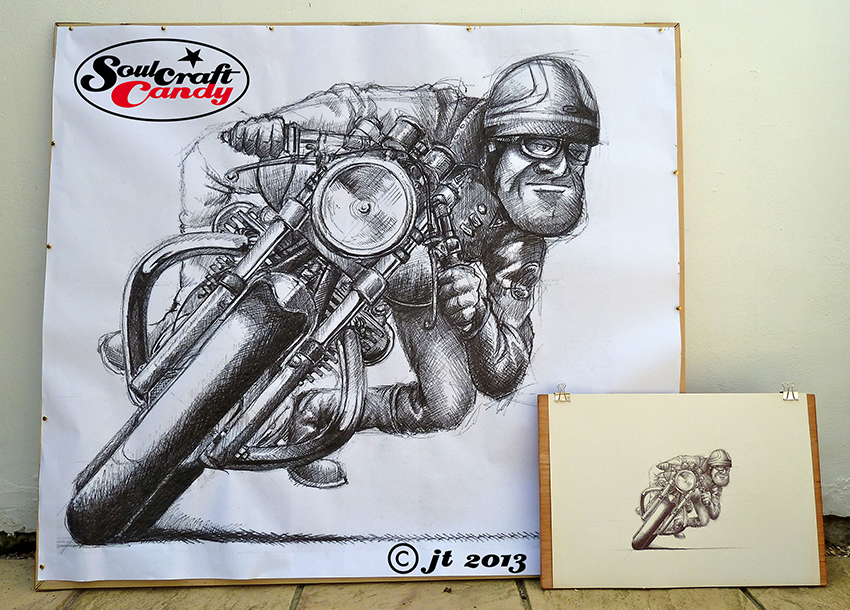
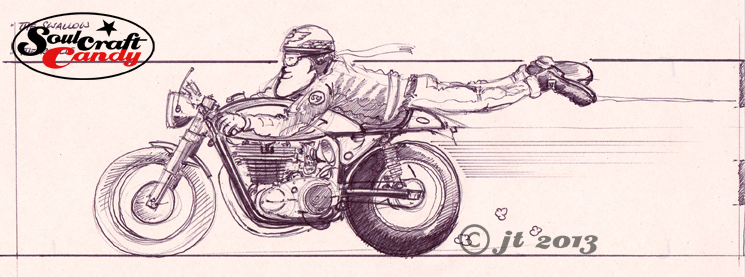
The main image at the top of todays post is such a work in progress and something I’ve been playing about with for quite some time. It started life as a very rough little sketch a couple of years ago and since then I’ve just tinkered with it. At first I thought it might make a good t-shirt design as in the version with the red gas tank, but never got far enough with it to confirm my suspicions. And then a few weeks ago I found it again and thought it might be better as a larger drawing in ink. What you see is the latest pencil layout for that big drawing. The t-shirt idea isn’t dead, but by finalising the details on the bigger drawing I’ll be in a much better position to undertake a reductive exercise to create a better shirt design. That’s the thinking anyway, and co-incidentally this picture has a working title of “The Bull”. S’funny how it worked out like that eh?


Havin’ it large.

Life size print of a cartoon by Jon Tremlett at soulcraftcandy.

The above phrase, regularly used and a feature of the colloquial landscape that is modern english, often refers to a bout of over indulgent and often excessive behaviour, invariably fueled by alcohol.


Despite there being little alcohol consumed at the time this idea was born, the phrase seems most apposite in describing the birth of the above creation. For quite a while now, the suggestion that the drawings should perhaps take on a larger scale has been hovering about in the back of my mind but, achieving this jump up in size presented lots of challenges that would need to be overcome. Aside from wondering where in the house one could create a big enough space to do it, the mechanics of transferring a basic layout onto large boards or sheets is something I’ve not yet figured out. I know that simply drawing straight onto large format sheets is tricky, ones perceptions of perspective and proportion are distorted, and being so close to the image as you make it means you can’t “see” all of it, so you have to keep standing back to check on your progress. There are lots of tools out there to help with these issues like projectors and setting up a copying grid, but the fact remains that it’s a daunting undertaking if you’re not practiced at it. I really wanted to see what one would look like blown up, before embarking on a creative exercise of this size.

Life size print of a cartoon by Jon Tremlett at soulcraftcandy.

Fortunately for me, a good friend who runs a small architectural office offered the use of his A0 plotter to run something out as an experiment. I knew that printing out a massive version of one of the finished biro drawings would rapidly consume his stock of black printing cartridges, not a good idea seeing as this was a generous offer already, so elected to use one of the early sketches which is much lighter in tone. The scale for the print was based on the size of the front wheel which would be approximately life size. There was no way it was going to fit on a single piece of paper either, so I split the picture in two with a bit of an overlap so it could be trimmed and glued together afterwards. The sketch was re-scanned at 1200 dpi to avoid any pixelation when blowing it up, resized across two sheets of A0 light weight plotter paper and converted into a pdf file to keep the file size down a bit, we didn’t want to be sat there for hours while the plotter got on with the job.


Back at base the sheets were trimmed on the kitchen table and the two edges stitched together with spray glue, before being pinned to a rough frame made from some scrap lengths of baton found in the shed. Choosing to do this on a really hot day at the start of a very rare heatwave meant the exercise was a little fraught and the subsequent union a little wrinkly, but it looks fine for what I wanted it to achieve. I took a couple of photos for the blog post with one of my crash helmets in the shot and the original sketch to give you an idea of the size of this thing.

Detail of cartoon by Jon Tremlett at soulcraftcandy.

There are some interesting things that spring to mind when I look at it. The jump in scale really shows up the distortion that occurs in the cartoon process, for example, although the riders body is about right, his head is really quite huge. The original sketch was done in biro onto non acid free lining paper which has a really gritty surface, and the way the line breaks up is very prominent in the blown up version and gives the whole thing a lovely looseness. Take a look at the detail shot to see what I mean.


So the question now is, what am I going to do next? I think it splits into two routes. The first one is to find a printing method, onto paper, canvas or vinyl, which will enable me to get one of the finished drawings done at this size. I can see them making great banners, or even applied to the sides of a vehicle in vinyl, though persuading anyone to take them may be harder than I imagine, but it’s worth thinking about. The second is to start to think seriously about how I would create a drawing at this scale, a journey probably riddled with experimentation with different media and tools which could be a lot of fun. Part of that journey has already started with the idea, hatched at the local coffee shop with my good friend Ben as usual, to investigate making a drawing instrument which creates the quality of line shown in the big print. And that is as exciting as actually doing the drawing itself, so I’ll keep you all posted on my travels in the world of large format printing and whether I can figure out how to construct the worlds biggest biro pen.


From blank sheet to finished picture – part 1.

With five of the small Cafe Racer colour pictures done and posted there is one left to do which will complete this set. Rather than merely post up the final finished version of it I thought it might be interesting for people to see more of the process I go through when creating these images. So for this one I’ve scanned the various stages as I complete them.

Norton_biro_1

The first step, once the overall composition had been decided, happens on the newsprint pad where I rough out a couple of sketches to get a feel for what I’m after. Often this involves sketching it out a couple of times as in this case. The first sketch is really just  about working out the proportions, rider position and the general look of the bike in the image. Once you’ve got something then you’re in a position to make changes as you see fit.

Norton_biro_2

So with this done, I decided that I wanted a slightly different looking bike and to move the rider up the tank a bit, good reason to do another sketch. I wanted to base this drawing around a twin cylinder Norton and a quick search on the net yielded the right picture which could inform me about engine details and other bits and bobs. I can now start to work these into the drawing.

Norton_pencil

With these two sketches done there is enough information on the sheets to allow me to transfer the image onto the A4 Bristol Board for the final version. This is where my handy little light box comes into its own. If there is a need to blow up or reduce the sketch size for this stage then it is simply a matter of printing out a quick scan at the right size before hitting the light box. For the pencil stage I need a good point to the pencil so use a 2mm leaded technical push pencil, with an H grade lead, which keeps a point well and isn’t so hard as to leave big grooves in the paper when you erase it. Most of the drawing is done freehand though I resort to my ellipse guides to get the wheels nice and tight. At this stage I’m building in all of the details gleaned from reference pictures like the engine case shapes, cylinder head position and brake details. I love density in these drawings so put a lot of effort into distorting things slightly and filling in all of the big gaps that normally exist when looking “through” a motorcycle. It’s also a good time to get all those tiny details in. I don’t necessarily need accuracy here but I do like things to be reasonably believable, if that makes sense. With the bike and rider done, I loosely put a box around it which will approximate the background block. By the time this pencil layout is done, my mind has already started to think about what colour to paint the bike, the riders helmet design and the background colour. Time to get the brushes out and a look at the various painting and inking in the next post.