Going large, how blowing up images changes their character and impact.

Vinyl banner print by Jon Tremlett for Soulcraftcandy.

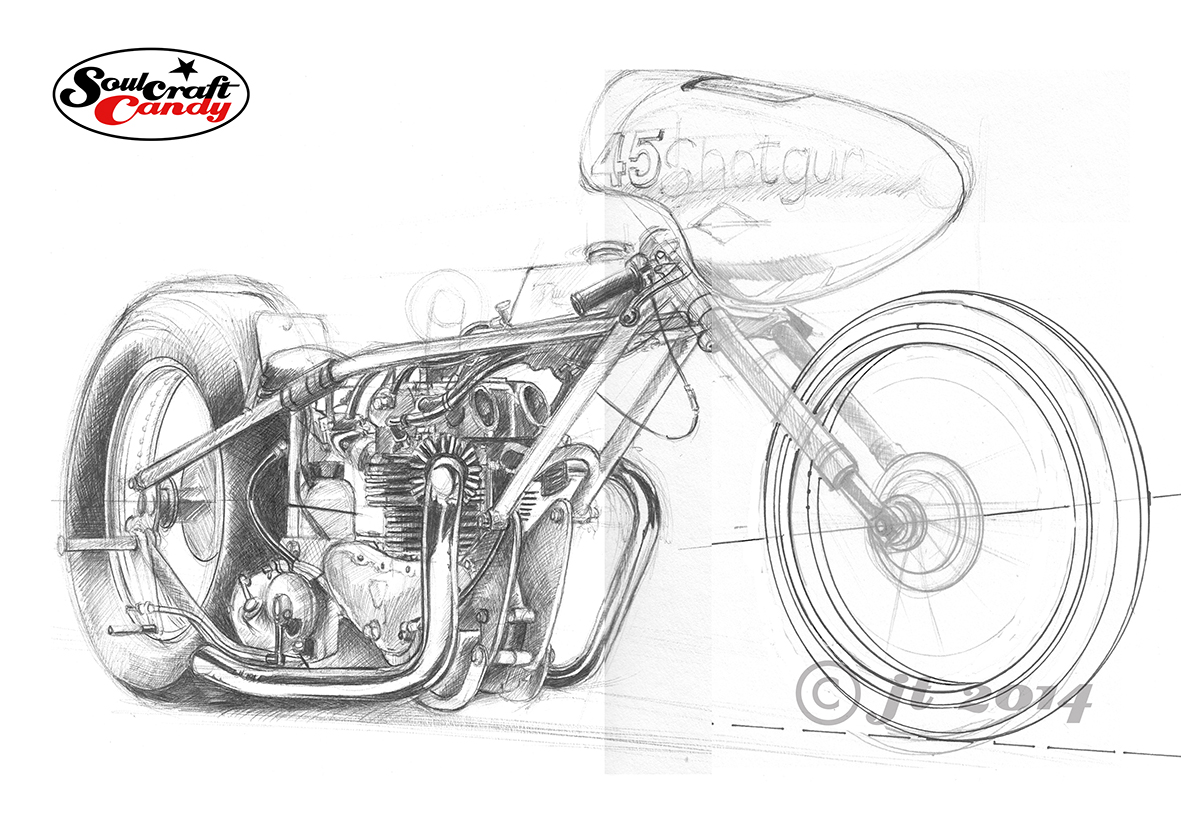
Another project that has spent many a month in the pipeline is the continuation of an experiment I started last year, where I wanted to see what impact it would have if I blew up one of the drawings to something like life size. While I’m still very much trying to figure out a way of being able to draw at this scale, it seemed like a good idea to get something printed in order to be in the position to make some judgements about how to approach such a challenge in the future. Initially I’d enlisted the help of a good friend, an architect with a big format plotter, to run out a couple of A0 sized sheets with the sketch image of the above drawing on. Taped together, these looked pretty impressive though the paper wasn’t too keen on staying very flat for long. Follow this link to that particular post.

After some further investigation, and with one eye on the possibility that I could use such prints for other purposes, it became clear that the best thing to do was get something printed on vinyl as a kind of banner. So this is what you see above, hanging in my dining room. It’s a metre and a half square, roughly 60 inches across and high, and is a thing of beauty, even though I say so myself. Well, I would, wouldn’t I ?

Vinyl banner print detail by Jon Tremlett for Soulcraftcandy

The jump up to such a scale causes you to regard the image in a very different way. The first is that it challenges your perceptions in that one hardly ever sees a cartoon at this size, so one is confronted by a strangely proportioned interpretation of a man and his machine. Some things fit and others don’t. The other change is that the print doesn’t hold any of the information in it back. Every single mark, line and cross hatch is revealed in all its glory, and so what appears a very neat drawing at normal size takes on a looser and more sketchy feel. As the creator, this change is not unlike revealing ones inner secrets of technique and skill to the viewer. Letting them see every stroke of then pen, every guiding thought and inevitably, every mistake. All unexpectedly liberating to see everything laid bare in this fashion. The good thing is, though I may stand to be corrected by others, that the drawing doesn’t suffer for this jump up in size in my mind, it still looks like a drawing, just a very big one done with a very big pen.

I’ve resolved to have some more of these prints done, and it would be really interesting to see what happens to one or two of the colour drawings. To see how every small daub of paint is shown in minute detail. The main challenge will be choosing which one to reproduce. Some would suggest that a painting should never be enlarged beyond its original size but, we do this to photographs so why not something made by hand?

Before I go I’d just like to mention that although vinyl banner printing is a widely available service, it pays dividends to find a printer one can talk things through with before placing the order. So many companies offer a web based service and instant file upload facility, but it’s the ability to see what your final print will look like where many fall short. Luckily I found one who did, so I’ll be visiting them again. If you need to know who they are please contact me.

Today I drew a car!

Mustang sketch by Jon Tremlett for soulcraftcandy.

I’m currently working my through a small book I bought recently about creativity. Needless to say I find it extremely interesting. The book is called “12 Rules of Creativity” by Michael Atavar, you’ll find it here. In the opening chapter is some stuff about training your eyes to really look at things, to really see what’s in front of you. What’s this got to do with drawing this car? Well, I’ve tried a number of times over the last few months to get this picture underway, and each time I have utterly failed to capture it in any way that was remotely close to what I was looking for. Realising the other day that it would be a good idea to have another go, I thought I’d read that chapter in the book again before picking up the pen. By reading the pages and looking up at some photographs I’d taken of the car on the computer screen, it was suddenly much easier to see what I was looking at and, see in my minds eye the composition of the image I wanted to create. Funny that. I’m not exactly sure how it worked but some connection in the brain suddenly got made, and forms that I’d struggled with previously seemed to be more easily understood. Once I’d established an eye line and got my head around the extreme perspective the sketch progressed fairly quickly, though I did have to have a couple of goes at getting the wheel angle where I wanted it.

Consequently I’m pretty happy with this first drawing, which I’ve done in my favourite blue Bic biro on a very cheap sketch pad. It will go onto the light box next so that it can be traced onto some watercolour paper ready for painting and inking.

Ultimately the picture is going to be a gift for my friend Christophe in France. We will be visiting him next month for a house warming party, so I’m hoping he’ll like it and put it up in the new place. He’s a confirmed petrolhead, and this is him in his beloved Mustang, a car I can only describe as a ballistic tank.

Starting the Shotgun commission.

Shotgun_sk_1©JonTremlett2014

A couple of posts ago I put up some colour photographs of a lovely red vintage drag bike called Shotgun. I’ve been asked by its owner, Nik Fisk, to create a picture of the bike for him. It’s taken a couple of weeks to get going but here is the first layout sketch done in preparation for the final picture. It’s done in black biro on heavy weight lining paper. When I was taking the photographs we discussed in some detail the view we wanted to achieve in the finished piece, something that hinted at the length of the bike, but also showed off the overall shape well and the fantastic old Triumph engine that sits at the heart of the beast. Having the right hand exhaust pipe nearly vertical we reckoned this would allow the curvature of the left pipe to be a feature and would also create a strong central element to the picture.

It would be far simpler, and probably much easier, to sketch directly over a printed photograph, or do it digitally using something like Corel Painter, but that would defeat the object of this exercise. In asking me to create a picture for him, Nik is looking for something created in a particular style, which we reckoned would be called something like “factual caricature”. This is not about creating a facsimile image, more about giving the image a degree of character which a photograph just can’t do. So with a picture up on the screen as reference I like to work freehand directly onto the paper, working out the relative positions and proportions of things as I go. It’s a rather organic process, one which not only makes you look carefully at the subject, but also embeds knowledge about that subject into your minds eye as you go. I find this part of the process invaluable and it enables me to make the slight scale and proportional changes which bring the caricature into the image. It allows me to do things like make the engine slightly bigger and bulk up the exhaust pipes to increase the sense of power of the unit for example. I always like to increase the fatness of tyres on bike pictures, in makes them look more planted in my view, but at the same time I need to make sure that the ellipses that outline the wheels are as correct as possible. This sketch shows a revised front wheel from the original sketch, done with some ellipse guides at a smaller size (my templates only go so big), rescanned and photoshopped into place. So when I’m freehanding the outline drawing for the final picture I’ve got some decent guidelines to work to.

The drawing is about 380mm from the back of the rear wheel to the tip of the front and sits very nicely on an A2 sheet, so a really good size which will allow lots of details to be shown. The next step is to check over this one, make some notes for adjustments and then use the light box to start the process of getting it onto the Bristol Board I’ll use for the final painting. This is going to be a lot of fun and I’ll be posting progress reports as things take shape.