Can you draw women?

Bike_girl_comp©JT2016

Ok, so here’s a thing, time for a confession, I’m pretty rubbish at drawing women. There, I’ve said it. This sounds like one of those introductory confessions one might be asked to make upon a first attendance at a therapy group. Like, “Hi, my name’s Jon and I can’t draw women”. This is neither something to be proud of or be ashamed to admit. Don’t ask me why this is so, it’s just the way it is. Some people probably find drawing people, whatever their gender or form much easier than others. Other folk probably find drawing men less hard because it is easier to express generic masculine traits and you can get away with portraying less good looking men (!?). And then there are those who find the innate curvature and character of the female form easy to capture because they just do. One thing’s for sure though, and that is that when asked to view a drawing of a woman most of us automatically make some kind of judgement based on the perceived beauty of the rendered subject, i.e. if your drawing doesn’t portray a pretty/elegant/feminine woman, it’s the first thing people will comment on.

The above is only intended to be a cursory observation, the whole discussion around how we render and view human subjects is much, much more wide ranging that this, but what it does do, I hope, is shed some light onto how difficult it is to get to grips with a subject area such as this. Not being someone who has ever really received the benefit of extensive life drawing classes or any formal training in figure drawing, I have arrived at a point in my creative life lacking the confidence to draw half the people who surround me. I’m sure I’m not alone.

This new challenge came about through a request from a contact about possibly designing some t-shirts for women. Throwing my usual caution to the wind I agreed to have a go and then quickly realised that I would have to do something about the fact that I have never really successfully drawn women who look like women. To be honest with you, when I’ve had to do it in the past I’ve either traced off a magazine picture or concocted something akin to a rather effeminate man. So, time to put all of that to one side and see if I could actually learn how to do it more convincingly. I don’t know which is harder, learning a new skill like this in a straight drawing sense or in the cartoonish vein in which I normally work? Time to find out.

BGsketch_comp©JT2016

Thankfully, and this is again where the internet comes into its own; one is not short of resources to study as a way of starting. One can not only gain access to myriad video based tutorials on YouTube etc., but you can also find every single kind of cartoon style referenced so you can easily see how different characteristics are emphasised depending on the style you want to follow. To give you just a couple of examples; if mastering eyes is problematic for you, there are hundreds of variations and iterations to be found within the Manga drawing style and if the classic hour glass figure is something that you want to focus on, you will find plenty of guidance if referencing mid 20th century lifestyle and fashion illustration.

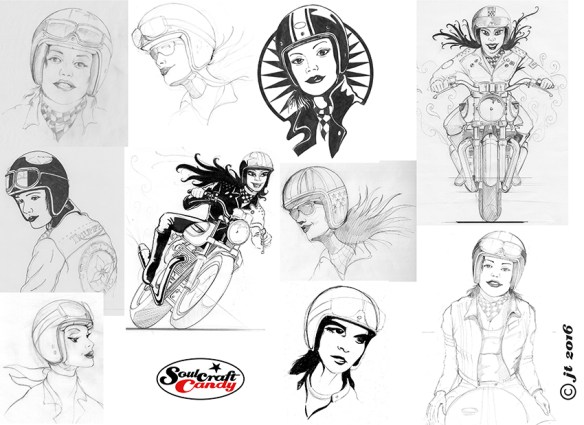
My brief, such as it was, was “Marilyn Monroe in a Bell helmet”. Quite a broad brief to say the least, so plenty to think about. My first scribbles, shown above in the first selection from my sketch books was as much about the brief as it was about learning the distinct attributes of a woman’s face. Eye shape, size and position, the jaw line, the line of the brow, the position and proportion of the nose and the mouth. These all sound incredibly obvious but until you have to think about them and draw them, your brain just rumbles on telling you that this should all be easy as it knows all this stuff already. No it doesn’t, you have to teach it and at the same time convince your drawing hand to follow. This goes right back to previous posts I’ve written about the idea of embedded knowledge. You’ve got to look and look and look, and then draw, draw, draw until hopefully things start to feel natural. It takes work and there’s no easy way around it unless you want to spend your life tracing photographs.

I was also trying to think about shirt designs at the same time, so this had quite an impact on my sketching, both in terms of speed and overall feel. Some of my attempts are way off, some are starting to point towards something more workable. The second of the images is another compilation of sketches where I am starting to get the hang of it, though you can see I’m yet to get my eye shape and spacing anywhere near right. I must confess also, that by this point I’d had gone back to referencing some old lifestyle photos in a book to try and speed things along. It seems to work best for me if I am combining an iterative drawing approach with regular reference to other materials. Placing a crash helmet onto a woman’s head brought its own challenges and I ended up taking lots of photos of my own crash hat at various angles to give me an idea of how its many curves look when not viewed simply in elevation. The bikes I didn’t seem to have a problem with. Funny that.

More on this in the next post I hope.

There’s treasure to be found in discount bookstores.

Pen&inkbook

It may sound rather overblown to make the claim above but, it does seem to be invariably true. Yes, of course it depends very much on what you’re looking for, and let’s face it, some of our hobbies and interests are somewhat esoteric in nature but, armed with an open mind and an open eye it’s amazing what you can find. Discount bookstores, like charity shops, are always worth popping into because you never know what they’ve got on offer, and any purchase it thus unexpected and a surprise.

Hence the reason for sharing the above book with you today. I found it quite by chance a couple of weeks ago in just such a store in Chiswick in West London. My good friend Ben mentions it regularly so I thought I’d drop in one day and take a browse. Immediately I saw this book I knew I had to have it, and at four quid it was a steal.

Recently I have been attempting to learn how to get a bit more digital with some of my drawings. A request to design a t-shirt has prompted a flurry of rather uncoordinated activity as I grapple with the process of converting a complex ink drawing into a vectorised artwork for screen printing. Luckily there are myriad guides and tutorials available on-line to assist me in learning the ins and outs of image tracing in Illustrator, and pixel fiddling in Photoshop, all of which have proved invaluable.

Pen&inkbook01

I mention this because this learning activity has given rise to a couple of thoughts. Firstly, the whole process of vectorising images would be a whole lot easier if I created drawings better suited to vectorising in the first place. The second is that in order to do that I need to learn some new tricks to apply during the drawing activity which help in the division of an image into dark and light areas and create ways of texturing, when needed, that translate well when making the jump to digital. This is where this book comes in as it is stuffed with information on how to create all manner of drawing details that can apply to the above.

The books author, Robert Gill, is a technical illustrator by trade and the book is full to the brim with his observations, expertise, tricks, hints and learnings, all garnered from a lifetime of experience. There are chapters that cover everything from basic perspective techniques to creating textures, from rendering plants and trees to drawing basic figures. There is even a section on equipment with a great segment covering Rotring technical pens and how to get the best out of them. I love it.

There is one more aspect to why I’m so enamoured by this book, and it is this. Drawing is a lifelong learning experience and something we all want to be better at. Through constant practise and experimentation we do get better at it but, there are times when you need extra input to boost your learning and skills. Since leaving art college and witnessing the transition from analogue to digital media within the design studio environment, I don’t recall being taught or learning anything new relating to analogue drawing techniques, other than what I’ve learned through my own scribbling. What lies behind a persons ability to create images through drawing is a large reservoir of accumulated knowledge covering everything from proportion and perspective, to materials and techniques. Design school stuffed a great mountain of this knowledge into my head many years ago. Outside a formal teaching program we have to add to this learning through self discovery, using practise and experimentation to hone our skills. But there are some things which we need to learn in different ways. This book is just such a tool for this purposes. Pen and ink drawing is one of my favourite drawing styles but, finding an easily accessible reference for learning new techniques has always been hard. This book has most of what I’m after, right in front of me in black and white.

Pen&inkbook02

It’s like finally having the analogue equivalent of a cool set of digital plug-ins for Illustrator or Photoshop. I don’t need to use it all the time, copy anything from it or read every page but, it is there to refer to and glean information from whenever I want to consider creating new effects through better mark making. Much of it may seem rather old fashioned but pen and ink drawing is just that, a pen, some ink and a piece of paper, nothing complicated. The complex part is training the soft, organic creature holding the pen and the little grey matter engine that powers it.

Here’s a link to the book, I found it on Amazon here.

Julian and the big Green Meanie.

JW_photo

Firstly, a very happy New Year to all of my readers and followers, may 2015 be a great year for all of you. Here at Soulcraftcandy I’m hoping for a year full of interesting drawing projects to grapple with, some new adventures featuring some new materials and obviously, a whole host of new fans and followers. Not too much to ask for then! So let’s kick off the new year with a story featuring a very old friend, a big green machine and a triumph of physics over human ambition.

The friend in question is Julian, a lovely former wild boy I have had the pleasure of knowing for over forty years. Once a hard core bike rider, his various exploits deserve a blog all of their own, now a responsible dad. Having said that, he has never really lost the bug and as we speak is preparing himself for an off road rally trip over on the Baja peninsula. Watch out Mexico. Back in the day, Julian was the first person I knew who fully embraced the modern sports bike and the newly (at the time) burgeoning cult of the public track day, a barely veiled excuse for Joe Public to go ballistic on his road bike within the controlled confines of a proper race track. Needless to say at one such event our man came a cropper.

Julian has always been interested in my pictures and finally got around to asking me to do a commission for him. It goes without saying that his choice of subject is poignant, being a depiction of him aboard that sports bike on the fateful day he badly broke his ankle and hung up his leathers for a while.

Here’s the photograph, above, he supplied as reference and as you can see it’s not in the best condition or particularly in focus, but that’s not too much of a problem, there is more than enough information here to get going. I wanted to base the picture on this view rather than create a new one, but just tweak it here and there as it’s a great image to start with.

JW_First_trace©JonTremlett2015

The first step is to get the photo into my painter program where I can trace over it in digital pencil to establish some outlines to work with. This initial process also helps to embed some knowledge of the subject into my head so I can start to think about which bits I want to change moving forward. I’m still too much in love with hand techniques to go fully digital with a painting yet but, I’m sure one day soon it will happen. Though when you do that all you get is a print of your artwork, not the actual artwork itself, which is a very different outcome.

JW_Blue©JonTremlett2015

Using the printed trace as an underlay, it’s then onto the light box for another tracing exercise where I can start to move parts of the drawing around, like changing the position of the rider, and playing with the proportions of some details very slightly to gain extra emphasis here and there. Working with the blue biro helps me to see one drawing clearly over the top of the other. You’ll see I’ve shifted him off the seat a bit and given him a more heroic “knee down” stance to get some added dynamism into the picture.

JW_Pencil©JonTremlett2015

This third stage is the final pencil outline drawing on to the water colour paper I’ll use for the painting itself. Again, working on the light box, I trace off the blue biro drawing, tightening details as I go but only putting in the lines that I really will need to rely on. An H or 2H pencil is best for this bit, and light pressure so that it doesn’t leave grooves in the paper surface. All this redrawing might seem rather time consuming but it means I don’t have to worry too much about moving a line or erasing things, both of which will only damage the surface of the water colour paper. Once this is complete I soak the paper and stretch it onto a wooden board in readiness for taking the paint washes. Through experimenting I’ve found that it doesn’t distort the drawing in any way if you stretch the paper after putting the image on it, the secret is just to be patient and resist scrubbing and dabbing the paper too much during the process.

JW_Paint1©JonTremlett2015

When the paper is fully dry it’s time for the first layers of wash. Here I’m using a combination of cake based watercolours, some from tubes and intense liquid watercolours. For colours such as the characteristic Kawasaki green the liquid colours are brilliant. They both lift the image off the page and give it real punchiness. In combination with something like Payne’s Grey one can achieve some lovely transitions from light to dark and some really intense shadow areas. I love them though it pays to exercise caution as a little colour goes a long way and it stains the paper unlike the more “floating” colours.

The next post should see it completed and I’ll take that opportunity to cover more details of the process. So watch this space, it will be here very soon.