Putting your learning into practise.

Girl_T_Comp©JonTremlett2016

As you will have read in the previous post, I have been expending a lot of energy recently learning how to draw women as part of a project to try and produce some designs for t-shirts for women. It has not been as easy as it sounds, and to be honest with you I’m still not sure that I have cracked it, though I feel I’m certainly making progress.

The journey from the collection of sketches to some finished proposals has been a long one involving lots more sketching and redrawing in an effort to get some kind of unifying style working across the various ideas. This process is invariably made all the more challenging by the considerations and resulting constraints that come from thinking clearly through the whole process of how these shirts are made and printed. The quality of the final printed image is reflected in, and can be traced right back to, the quality of the picture you create in the first place. The shirts made from any of the selected images will be screen printed which means I need to aim for crisp line work and clearly defined details.

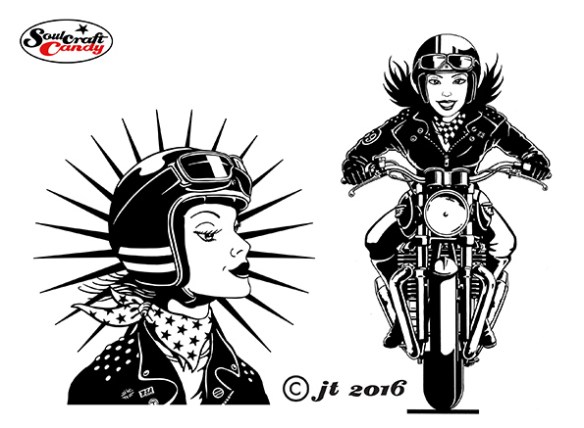
In the absence of a more detailed brief I decided that I would go forward with a combination of ideas. Firstly I picked two rather obvious ideas based firmly on a girl riding a bike, and then chose a couple of others based around a more emblematic approach. Each one was worked up as an inked drawing to start with, and done as neatly as I could manage. The girls on the bikes were reasonably straight forward to do in a general sense though I was really conscious of introducing something to try and bring some increased movement to the images. I’m not a fan of using speed lines and blurring to do this, my drawing style doesn’t work that well with them, so elected to simply try and show movement by trying to mimic hair blowing in the wind. The second two choices came from trying to approach them more like logos than pictures and incorporating some recognisable cues from the cafe racer scene like chequer pattern and jacket decoration.

Girl_T_Comp2©JonTremlett2016

Drawing these things is time consuming enough, but tidying up the high resolution scans can be even more so. Again, it’s back to the quality of the image you start with. Screen printers will invariably ask for vector based artworks and so each drawing needs converting from a scanned bitmap image to vectors in a program such as Adobe Illustrator. The software handles this with ease, but you have to ensure that your starting image is as clean, crisp and high contrast as possible. The vectorising process essentially traces your drawing creating paths and fills as it goes. By adjusting various controls in a dialogue box you are able to influence the fidelity with which the software does this task. The cleaner your starting point, the fewer options the process has for including or excluding small elements of the drawing and details. Once the drawings are vectorised though, you can easily include them in more complicated designs in Illustrator, edit them further, or simply use the resultant artwork as it is. If I was more proficient in Illustrator to begin with I might be able to draw these things directly in the program, but sadly my skills aren’t there yet. At least using this approach I end up with both a good quality digital artwork and a nice ink drawing for the portfolio as well. Because the digital images are now editable, one can make limited changes to them if need be, without the need of doing a whole new drawing.

112_T-shirt_comp1©JonTremlett2016

Finally I thought it would be fun to show the ideas as shirts rather than just images on their own. Plundering an image search for white T’s being worn, it was simply a case of pasting the designs into place to lend a degree of realism to the whole thing. I then sent these to my client/contact and began the waiting process. Let’s see what he comes back with.

Advertisement

Virtual interactions.

Soulcraftcandy cartoon cafe racer.

Two posts ago I talked about the many distractions hanging in the air these days, they are all mostly still there though my mind is slowly learning to ignore them. After all, one can only do one thing at a time and besides there are quite a few things to finish before immersing myself in a new medium, material, technique etc. Best get those done then.


Here is a more completed scan of the picture featured in that very post. The bike and rider are now done and it’s background time, again. I wanted something impactful but simple, colour but not complicated. I’d settled on a sun and sky combination and wondered about treating it as a series of concentric arcs of colour across the page. Sounds simple enough I thought, though knowing also how easy it can be to make a complete mess of a decent picture through the application of an ill considered final detail, I resolved to “sketch” it out in Photoshop first. So now we get the image shown below.

Soulcraftcandy cartoon cafe racer.

It is not looking too shabby at this stage, but I’m already wondering whether this is achievable in ink and paint given that the paper is Bristol Board, not the best thing for getting large areas of really flat colour. This is one aspect that Photoshop and other similar softwares can’t mimic. The digital space is a nigh on perfect canvas, free of the foibles of papers, boards and other physical media. Ones brushes are consistent in their behaviour, even when using a tablet as I do, and their “feel” is experienced through your gliding across the uniform surface of the tablet and the application of tiny variations in pressure. All lovely, but nothing like the real thing. So whilst I’ve got myself a scheme that seems to tick all of the boxes for me, the real challenge now will be rendering it in the mucky, unpredictable and unforgiving analogue space, where water manages to help and hinder all at the same time.


Making it different.

TT racer sketch

Apart from the story conveyed by an image to the viewer, a picture also contains another story, that which lies behind its creation. This is not the narrative expressed by the image but the tale of how the image was made. Whenever I look at an image the “maker” in me can not resist trying to work out how it was made. It is this questioning which drives my desire to try and share, whenever possible, the processes which lie behind the images I create. The techniques I use are not complex and I don’t use any cunningly developed or unique ways to create them, so why not let others see how these things come into being.


Above is the first sketch for a picture I am now working on. It comes from a series of sketches done for the V-twins project. The inspiration for it is american dirt track TT racing where oval tracks are supplemented with right hand turns and jumps. I find the idea of flinging a big heavy 750 around this kind of circuit attractively bonkers and so, worthy of a picture. It’s done simply in plain blue biro pen on some of the cheapest and low quality sketching paper I own. Believe me, it’s a good deal messier than the scan shows thanks to the wonders of playing with the levels in Photoshop in readiness for posting. Those shaded areas cover a multitude of hidden lines and you can see the engine has received some attention from the Tippex pen too.


Using my trusty little lightbox the image was transferred onto some water colour paper, firstly in pencil which was then overdrawn with fine black biro pen. I wanted to try having another go at introducing some colour to the images so thought I’d start on familiar ground with some water colour paints and inks. Normally one would stretch paper before making even an outline drawing, but that would not allow lightbox use so I stretched it after copying the drawing across. It’s a great way to do it and the image doesn’t seem to suffer any distortion at all.


The following images are my progress updates. The first is laying on some light washes to give the image its base colour. The second shows you what I’m aiming towards. By applying my usual biro pen technique over the washed areas I can achieve the impact I want but with a degree of colour behind it, and thus a nice bit of punch too. I suppose it’s very like how you ink in a comic strip but here I’m aiming for some variation in the tones and not such a contrasty finish. The third one just shows how far I’ve got. In reality I should have applied all the washes before picking up the pen but wanted to show what’s building as much as see for myself whether I was on the right track or not. Looking good, though forgive the odd colouration, my camera does odd things with daylight.