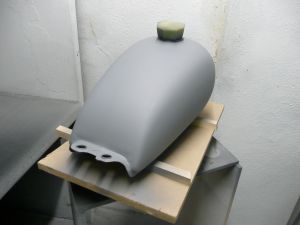
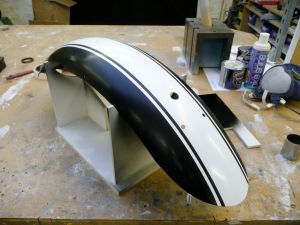
The full list of parts that were to be painted consisted of the fuel tank, two side panels, front mud guard, rear mudguard and the small fly screen. Six parts in all. Before preparing their surfaces for painting it was important to make sure that all trimming had been done and that all edges were smooth and free from any swarf.
Although it would have been ideal to hang the pieces whilst painting them there wasn’t enough room so some stands were made out of scrap wood and card, and the parts could then sit comfortably on the spraying turntable during application.
Preparation for priming: Firstly everything was thoroughly cleaned and degreased. The tank badges were removed, mountings ground down and body filler applied to fill any recesses. For the plastic side panels a small piece of ABS plastic was glued behind the now empty badge holes to provide a backing for the filler. This was all then sanded flat and all old paint removed using fine grade wet and dry paper. Once dry everything metal was treated to some etch primer. After another rub down with fine paper (wet and dry, 800-1000 grit) it was all then coated in grey primer and left to dry overnight. No plastic primer was used as the straight cellulose primer adheres well to plastics like ABS without the need as long as the surface has a good key.
Application of base black coat. Another rub down to sort out any tiny surface imperfections and a final degrease to remove any finger prints it was time for the black. For cost and convenience reasons I’d chosen to use standard cellulose paints for the job, a litre each of black and white. These would be mixed with clean thinners to make the right consistency for applying with a small gravity fed spray gun. In effect the paint ends up being of a consistency somewhere between milk and single cream. Too thick and you need too much pressure running through the gun and risk creating an “orange peel” finish. Too thin and you risk the paint going on too wet and creating runs or “curtains”. In essence it is purely experience that guides you in balancing paint thickness, air pressure through the gun and controlling paint flow. Having said that it is invariably the case that building up the paint in a number of thin coats will give you the best and most consistent results. Runs and other imperfections can be rubbed out later but if you can avoid them all the better. Once sprayed all parts were then left to dry for a couple of days. It’s worth remembering that when paint feels dry it may be so on the surface but, often it remains quite soft underneath for some time and can easily be damaged by a finger nail or small knock.
Application of white stripes. With the black fully dry everything was rubbed down again with extra fine paper and water to provide a good “key” for the stripes. The stripe edges were masked off with professional quality 3M Fine Line masking tape. This is a plastic based tape so has a very crisp edge, unlike readily available paper based tapes which don’t, and as a result never give you a crisp line on your finished part. It was really worth finding this stuff and paying the extra for it. It comes in a variety of widths and is relatively flexible too, so you can create smooth curves as well. Lovely stuff. This was used on the edges and the remaining area covered in conventional tape and paper. Some white primer went on first and then the final white was built up slowly in light coats. The masking was removed after a couple of hours. Long enough to let the paint dry a bit but not so long for it to harden up and risk tearing. Again everything was left to dry for a couple of days.
Final lacquer coats: Although standard paints come as gloss finish straight out of the tin, they have a percentage lacquer content already, they invariably need a good polish to bring out the full glossiness once fully hardened. As a protective measure as much as for aesthetic requirements a separate clear lacquer is often applied to give the surface some extra depth to the shine. For all parts except the fuel tank, the plan was to give them all a good coating of cellulose lacquer to finish off. The tank itself was going to get some petrol proof lacquer I’d spotted in the auto shop. Unleaded fuel just eats normal finishes for breakfast unless you’re lucky enough to be using 2-pack systems. Not unusually the black and white had dried to a kind of sheen. This is not a problem as both would be rubbed down again using 1200 grit paper and water. This creates a very matt surface but provides enough of a key for the lacquer and the full colour returns upon application. The last thing to do was apply the small vinyl cut graphics that had been made for the side panels and the screen. These decals are cut from single colour vinyl sheet, so the red parts are separate from the white and were supplied by a friendly repro shop who have done stuff for past projects. Supplying your own artwork as a vector art file keeps the cost down and the lines crisp, and there are a huge range and variety of vinyls available if you ask.
 Making sure everything is smooth, dry, clean and free of any dust is crucial before putting on any lacquer. Many pro paint shops use Tack cloths at this stage. Essentially these are a cloth made from a very loose weave cotton impregnated with a slightly sticky waxy compound. Passing one of these gently over your paintwork picks up and removes all tiny little bits of dust and grit from the surface. They are designed not to leave any residue on the paint either. So a quick once over with one of those and it’s lacquer time. Like the paint this is built up through many light coats carefully following the instructions on the tin. Go too heavy with this stuff and it runs very badly.
Lacquer, if it’s not 2-pack, needs to be left for a good week to properly harden up before polishing. A long time and it’s a real challenge to resist, but then again it’s a good time to take care of all those outstanding little jobs like tidying up the wiring, setting up the drive chain and adjusting the brakes. The next big job was going to be the final assembly so my fingers were crossed the seat would return in time.
